Check out my process below:
Materials
Burlap Fabric
Stencil Film
Acrylic Blue Paint
Foam Paintbrush
Craft or X-Acto Knife
Cutting Mat
Tape
JuteTwine
Glue Gun
Scissors
1. I measured out my burlap squares with a ruler and a pen to mark. My measurements were 5 and 1/2 inches across, and 6 and 1/2 inches down. I got my burlap at a local fabric store, but you can find it online at Joann's, and use a coupon to save!
2. After cutting the squares out, I folded it in half length wise and pinned it together. I then measured 1 and a half inches from the bottom on the folded part and marked it with a pen. Start at the bottom left corner where the sides are pinned, and make a slanted cut from the corner to the pen mark. Now I had the shape banner square that I wanted. You can be creative with this part; leave the square whole, cut a triangle, really anything!
3. I wanted to find the perfect font to use as a stencil. Since the baby shower is French-themed, I went with the appropriate named "French Script" in Microsoft Word. I printed out the letters in 400, 450, and 500 size fonts to pick and choose which one would look the best. For my size banner I went with 400. Here is an example of what the French Script lettering looks like:
I also wanted something to break up the words if I was going to do something like Bon Appetit all on one banner, so I printed our this Fleur De Lys stencil I found online:
4. I printed all of the letters and the Fleur De Lys onto white paper. I then taped the stencil film on top of the paper so that I could see the lettering underneath. I placed it on top of a cutting mat, and taped it down securely. Using my craft knife I followed the outlines of the letters. Be really careful with this part since the knife can be so sharp. It make take a few tries to get down a good technique.
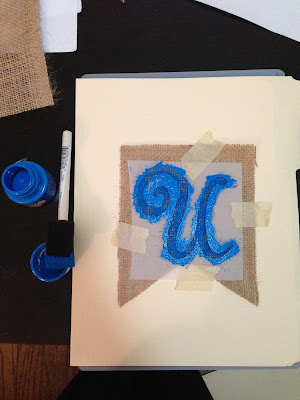
5. Once I had all my stencils cut out, I placed each letter on top of the burlap squares. When the placement looked about right, I lightly taped the stencil onto the burlap so it wouldn't move around. Using a foam paint brush, I lightly dipped it into the fabric paint, making sure to blot any excess paint off. I used more of a blotting method to paint over the stencil.
6. Once the paint had dried slightly (not too long because you don't want the stencil to dry and stick to the burlap), I carefully removed the tape and the stencil. And oila! Pretty perfect huh? I'm very proud of myself!
7. After all of the squares were stenciled and dried, I used a glue gun to glue the jute twine to the back of the burlap fabric so that I could hang it up. Leave quite a bit of twine at each end so that you have plenty to play with when hanging.
And that's it! A beautiful hand made banner at a fraction of the cost. Let me know if you have any questions, and good luck!


No comments:
Post a Comment